Showing posts with label interior design. Show all posts

Sunday, 28 August 2011

Patchwork upholstery

Cath Kidston vintage find in the Brighton shop

Cath Kidston has been giving me ideas...again! I think i want to cover my little arm chair in a patchwork like this. I think it looks amazing.

I had better get sewing.

Monday, 25 July 2011

The green lounge - Part 2

Quite some time ago now, I wrote a post on the imminent purchase and delivery of a Green Lounge / Sofa / Settee / whatever you want to call it. I promised to post some photos when it arrived, but I very naughtily forgot all about it untill I recently came across the post again! So here it is – my big comfy green lounge!


It has made life so much cosier.

Tuesday, 14 June 2011

Apologies and novel retro

I have been a very bad blogger of late; no updates or any warning! But I am back again now, after a month (or two) off due to family visits and other general change in our household. But despite all that, and being a bad blogger, i have in fact been busily working away on a few projects.

And here is one...


I made this cushion a while ago now for a friend's birthday. We found the fabric in a cool fabric shop on Columbia Road called Beyond Fabrics. To me, the orange, lime and yellow combine to create a very retro looking cushion given a modern spin with clean cotton lines. I have photographed it with another design classic reworked - my Anglepoise Type1228.

You can pick up good quality cushion inserts at John Lewis. I learnt this quick and easy cushion cover pattern at the Make Lounge a few years ago now (i have raved about the Make Lounge on here several times before). Londoners (and just outside Londoners) can learn too here.


Novel retro indeed.

Tuesday, 19 April 2011

Our fantastic fireplace and the domino effect

I know i have written about our loft bedroom fireplace before, but we have just completed some work on it recently that i wanted to share - it is finally 'finished'. After over a year of umming and ahhing we finally bit the bullet and sprayed the fireplace and its wooden backing frame with a matt black stove paint.


I think it looks amazing. We were both so scared that we wouldn't like the effect, having grown so fond of the raw iron look, however it has turned out brilliantly. The sharper shade of black shows of the tiles even better than before. The whole structure looks uniform all of a sudden, i don't why it took us to long to decide to do it now - but i suppose everything is always clearer in hindsight.


What's more, we have grown tired of the 'white everywhere' look and have started splashing Farrow and Ball paint (I LOVE LOVE LOVE this paint!) on every surface we can find. Our bedroom walls are now sporting a very pretty shade of Ringwold Ground, a dusky cream, and the fireplace recess has been painted Calamine (my absolute favourite colour at the moment), a dusky pink to match. The lavender we had painted previously on the chimney breast was pretty, but it just wasn't the right colour for the room and didn't match our belongings (you can see it here). Where the lavender clashed, the new shades complement the curtains i made many moons ago for our old bedroom, but because i spent so long sewing them, there was no way i was leaving them behind when we moved upstairs (that said, i still need to hem the bottoms!). The cream wall with the pink feature echos the pink flowers on the yellowy cream background of the fabric.


Most of the fireplace tiles present this colour and pattern style too - with pink blooms in the lovely yellow glaze.


On top of this, the bedside table i painted with leftover paint matches perfectly, with James White (another Forrow and Ball paint, though this time in the eggshell finish - the rest has been painted using the estate emulsion that gives a matt finish) being used on the bed and the built in shelves. It even has the Calamine interior to match the fireplace recess.


Domino: The Book of Decorating: A Room-by-Room Guide to Creating a Home That Makes You HappyI used the curtains and of course THE bed to inform our colour choice. In the end, they acted as the first piece in the Domino effect - something i read about in a beautiful, inspiring and thoroughly accessible interior design book by the same name - Domino (eds Deborah Needleman, Sara Ruffin Costello, & Dara Caponigro). They reason that you probably have a few pieces that you really love and it should be these pieces that you decorate around and in the end you should get 'your look', and it will probably end up being something quite personal and even better, it doesn't have to be expensive. I think our bedroom is a brilliant example. It wont by any means be to everyone's taste. But it is perfect to me. The assault of prints, pattern and colour on the eye make it everything i love. For a long time, i kept getting stuck, for example i painted that wall lavender just because i loved the colour without really thinking about the other items and features in the room. The book's strap line - 'a room-by-room guide to creating a home that makes you happy' says it all really.


So, yes, i think it is all, finally, coming together. I think it takes time to know how to decorate a space, i think living in the loft as a large white canvas for the last 12 months has given us the chance to imagine and dream about what our bedroom could be. I'm a bit worried that it maybe has turned out a bit feminine for my husband, but the overruling motif of flowers is one that he appreciates in the garden, so i figure he cant object too much! I think, overall, the warm glow of the colours and preloved nature of most of the furniture gives the room a sense of character as well as being comfortable and inviting. I tell myself this in order to feel better about it taking well over a year to get out room looking complete!

Now, i just need to get back to the markets and salvage another bedside table, this time for my husband, because the thing he has at the moment just isn't cutting it!

Sunday, 17 April 2011

My perfect bedside table*


A few weeks ago, I took a trip out to my favourite antique fair, Sunbury, in search of a new (by new, I mean old, but new to me) piece of furniture I could use as a bedside table, and some of those pretty antique mirrors with the bevelled edges I love so much. And I was very successful, walking a kilometre back to the car with a potential bedside table and two heavy mirrors wedged under each arm. When I finally got my breath back and my arms no longer felt like they had been stretched, Gumby-esque, so my fingers could brush the ground as I walked, I started the car and bundled everything home.

The bedside table was a bit of a mess really. And it wasn’t the best quality, nor the best value really, costing me £40, but there was something about it that I just really liked. Its shape, its shelves, its sweet little cupboard space, it was everything I had in mind for the perfect bedside table. It was a bit warped, and one of its legs had seen better days, with a metal bit jammed into the rotten wood to make the unit stand straight. It was dirty and its paint was chipped and yellow. It also only had one knob that I suspect was from the 70’s – retro, but not in a good way – and rather incongruous. Despite all this though, I just knew – this was the bedside table for me.

Once home, my husband went over it with the electric sander to even out its imperfections and help me prep for the paint job I was about it give it.

I used some left over bits of paint from other projects around the house, all Farrow and Ball, to give it a new look. Gone was the dirty, yellow, chipped exterior, now a beautiful antique white, James White, in an eggshell finish. The inside of the cupboard, once red, having been coated with what I can only guess was red oxide paint, although I can’t think why, is now a beautiful pale, dirty pink, very much like its name, Calamine. I then painted over the once black inside of the doors with Lamp Room Grey.


The single incongruous knob has been replaced with two pretty mismatching glazed ceramic knobs from Anthropologie - one a pink flower with aged bronze fittings, and the other, a yellow drop knob, again with aged bronze fittings. Both match the colour scheme perfectly, and complement each other enormously (even if I do say so myself!).


Disappointingly, I didn’t get a photo of the bedside table before I started work on it – I always seem to realise I have forgotten this towards the end of my renovation. But I have got some in progress shots as well as one of the ‘original’ knob that I think I might clean up and try and find a home for elsewhere.


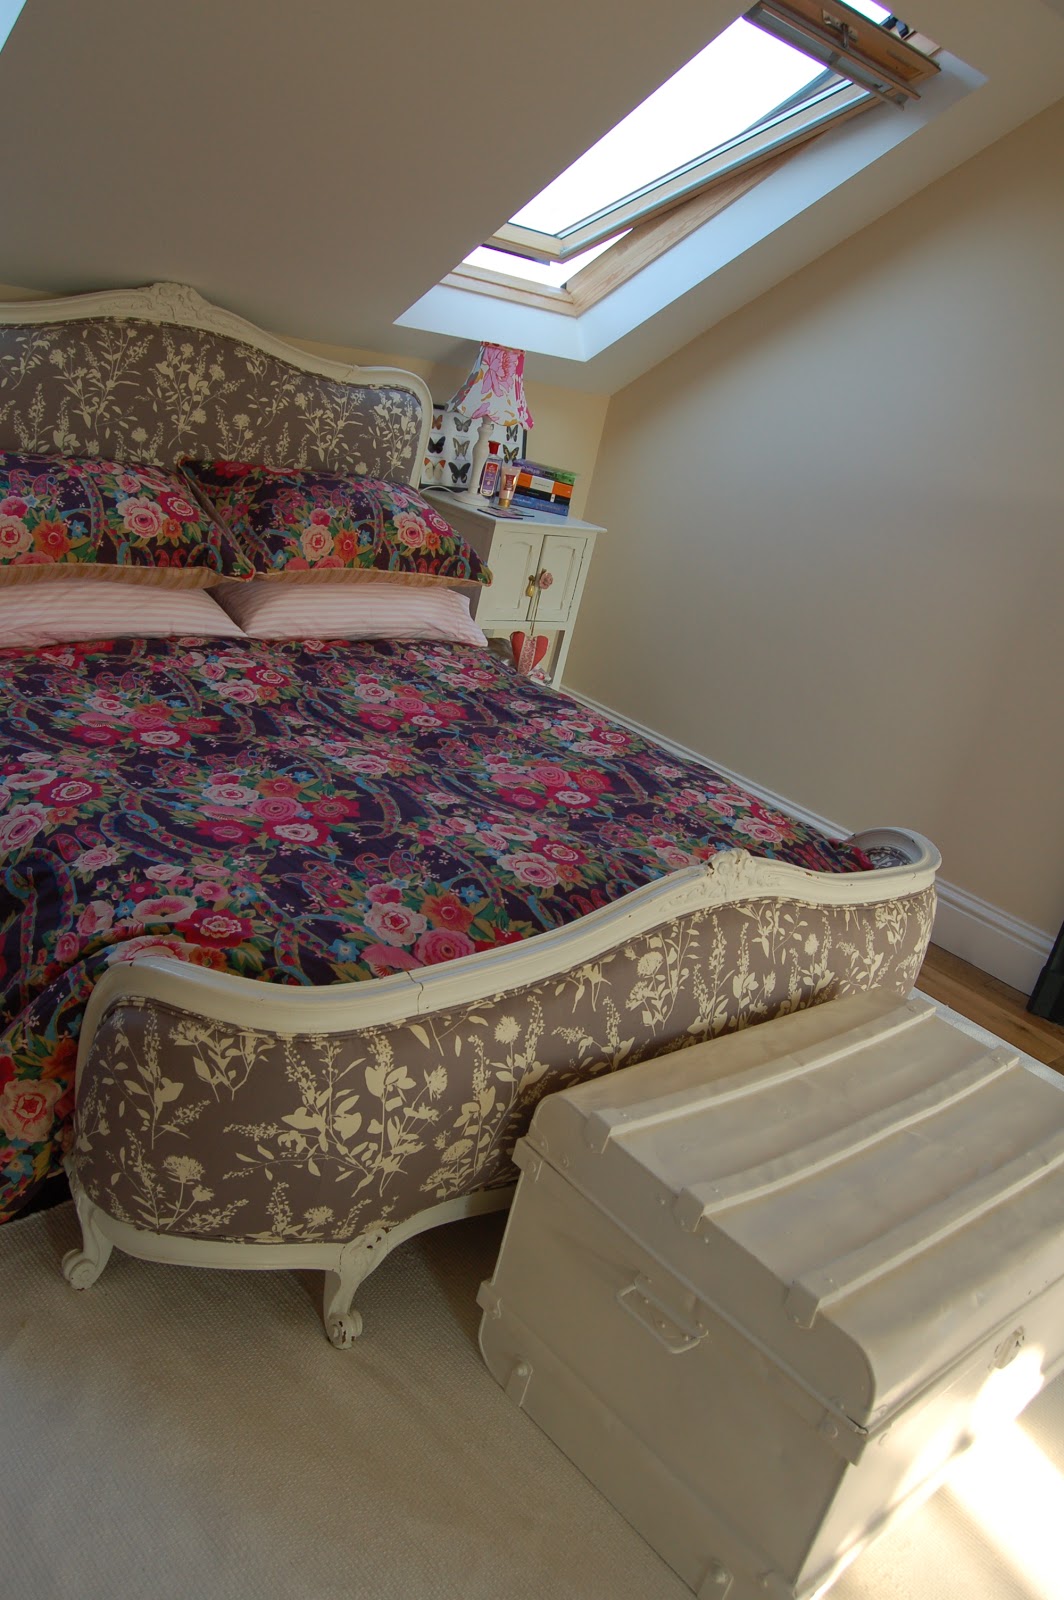
Finally, here is the bedside table, in situ, next to the rescued and newly upholstered bed. I can honestly say that after I pick my favourite pyjamas (always Peter Alexander) from one of the shelves, place my beloved iPhone on to charge on the shelf next to my bedtime reading, smooth on some Rose L’Occitaine hand cream from the cupboard, deposit my watch on the surface and finally take a sip of my water before I settle in for sleep, I close my eyes smiling.


*perfect to me anyway.

Sunday, 30 January 2011

Some holiday upholstery

Sorry for the post drought. I have been on a month long holiday back home in sunny Sydney and found that after dealing with Jetlag, taking mini-breaks within the holiday, attending a good friend's wedding and visiting friends and family, i didnt have much time for posting! But never fear, because i was building up a nice little list of items that i must share.

First are these cute little dining chairs.


When i got home, my mum asked if i would mind recovering some little dining chairs she had picked up from the side of the road for our big Christmas dinner. My dad had already painted over the wood with white paint and i had come armed with some Cath Kidston oilcloth in Provence Rose blue and green from the UK. I only got half a metre of each so it came to £20 for the lot. We managed to cover 5 chairs too (with a little left over for some makeup bags perhaps?), so at £4 each plus the paint, the whole new look was a bargain!


Dad and i got out the staplegun and spent my first day home recovering the seats. They went from ugly black seats destined for the tip to gorgeous floral chairs with a new lease of life in no time.


Not bad for a bit of holiday upholstery!


Friday, 26 November 2010

Fireplace restoration


I have been wanting to share my reclaimed, rescued and restored fireplace and mantle piece for a while now.

I found it in a reclamation yard in North London (the one I saw on Kristy's Homemade Home in fact). It was a sad looking thing. it had been painted white at some stage and was all rusty with some of the ugliest tiles i have ever seen. I obviously showed far to much excitement upon finding it because the owner wouldn't budge when I tried to argue the price down from £50, which frankly I thought was a bargain considering some of the ones I had seen sold on eBay for 14 times as much.

The face features a pretty wreath detail that I found charming and thought would complement some of the vintage tiles I had already started collecting for it. Its shape was also ideal, being fairly narrow and not to tall to work well with the lower ceiling heights in the loft.

The restoration involved getting it dipped (in an acid bath!). I was going to attempt this stage on my own with some NitroMors, but thought the better of it. The dipping removed the layers of paint and rust, taking it back to its original cast iron finish. When we got it back it had to go back outside for a little while before the builders could fit it. This meant it started to oxidise again and came out in rust spots again. My husband, bless him, sanded all of these spots off for me again. The oxidisation largely stopped once it was bought inside, hence I haven't been rushed to make a decision on what type of varnish, paint, sealant I want to use. Suggestions again are more than welcome. I was thinking of painting it white initially, but I have gone off that idea now.

The original chimney breasts - from the fireplaces downstairs, worked as a natural looking protrusion to bolt the mantle on. Because of a mistake the builders made in placing a RSJ, it couldn't sit as far back as I hoped, but the builders made a casing out of wood, that eventually will be painted over to look like a continuation of the fireplace. This also meant that a sweet little recess could be created where the fire would have been. I have used this area to showcase little French oils, books and other knick knacks.

I purchased each of the tiles from Portobello road. Each is unique with the bulk from 1800's England. There is a Japanese one or two in the mix too. I think my favourite is the yellow tile, it reminds me of a lemon tart. Yum.


Sunday, 21 November 2010

ENO's La Boheme at the London Coliseum

I went to the Opera last night and saw La Boheme at the Coliseum in London. It was great, and quite something to hear those songs I knew so well from my parents CD and movie collection (Moonstruck anyone?) belted out 'live'. But I have to admit, the bit that really caught my imagination was the set design. WOW. Don't get me wrong, it wasn't fancy or dazzling or anything like that. It was the "miniature-ness" of it. Like a life size doll house, that spun around to reveal different rooms and even a street scape.

I couldn't take any photos unfortunately, I did get one of the curtain before it went up, but that was all I could manage. However there are a few lurking around on the web that you can see here or check out the video on the ENO page.

This particular version on La Boheme was set in 1930s Paris, and apparently was heavily inspired by photography from the time. The style of the windows, the brasserie and even the staircase were so authentic and conjured up a real sense of the Parisian architecture of the time. I particularly loved the advertisements painted on the walls, entirely reminiscent of those interwar years.

As the characters are 'bohemian' and essentially poor, there is no glitz to be seen, except perhaps in the brass fittings in the French brasserie they dine in during the second act. Otherwise, the sets are furnished with drab material, dirty looking bed sheets, an armchair that has seen better days, a few wooden dining chairs, some lovely old wash basins attached to the "invisible wall" we view the set through (nice touch in my opinion), and some long work benches that reminded me of the old science labs at school.

The use of light was special too. The room in which Rodolfo and Marcello live had some wonderful little skylights that cast lovely shadows on the room. These shadows were even nicer as panes of glass were cross hatched with lead to create long trapezoid shadings on the wall. The broad expanse of glass across the entire back wall of the room gave the studio a very artistic feel. Oh and the light fittings, some lovely industrial styled shades hanging from lone cords from the ceiling.

I found the female character's outfits were really quite lovely too, particularly as I am very fond of the fashions from that era. Again, poor Mimi's dresses were generally stained and marked with dirt, but the cuts and colours were really something special. Musetta's outfits were tailored pieces that were better cared for, probably thanks to her knack for snaring rich men.

What an amazing job it must be to come up with these set designs. All you set designers out there - I envy you.

Thursday, 7 October 2010

The green lounge

We have bought a GREEN lounge! Yes you heard it right, a GREEN lounge, and I'm not talking about it's eco friendly credentials either. It was only after we left the store that I started thinking... I haven't seen many green lounges around. 
 
Why is that?
Have I made a mistake?
 
I started to worry that my Mad Men fuelled obsession with all things retro had compelled me to turn our Edwardian, classically styled lounge room into a 50's den. That would kind of be ok, I guess, but the lounge itself isn't really 50's shaped. It was purchased purely with the aim of providing us with somewhere comfortable, cosy, and warm to sit. Its a big lounge. I want depth. I'm not interested in shallow sofas. If your seat doesn't meet the backs of my knees, or even better, the backs of my calves, I'm not interested. I feel strongly about this. You would too if you have been sitting on a park bench covered in leather trying to masquerade as a lounge for the last 4 London winters. No, I really didn't care about the look of the thing, but I did care about the colour, a contradiction? Maybe, but that's the way it was. I think I felt if the lounge was the right colour, it didn't really matter what it looked like, it would 'go'. So it needed to 'go' with  -
  • A medium shade of brown leather - its nice and soft looking (very deceptive),
  • Dark wooden furniture (bookshelf, chest of drawers, side tables, coffee table, old-fashioned-oval-framed-mirror, etc),
  • And mid brown, wooden, parquet floor.
Basically, a lot of brown.
 
The naturalist in me, immediately thought of trees - GREEN! Green will go great. My husband agreed, coming up with grass and tree trunks - "Grass and tree's always look good don't they?" Yes, I agreed wholeheartedly, but at the same time wondered why he had thought of grass and not the leaves for the green component?
 
Green and brown... I started to wonder about green and brown. Weren't there a lot of brown and green kitchens in the 70s? You know the sort I mean? I keep getting flashes of the Brady Bunch. This could be bad. 

The colour wasn't the only decision, there was the grade of fabric, and the fabric type itself. Decisions my mum would take weeks over, with swatches all over the house, I was left to make in 20 minutes before rushing to my upholstery class (No, I'm not going to be upholstering myself a lounge anytime in the foreseeable future, I am still working on a bed frame, and the next project is a small armchair - baby steps, baby steps). And then there were the various shades of green, from zesty limes to dark, foresty shades. Ours is somewhere in the middle, closer to zest than forest.

I have another 24 hours to ruminate over this before my 'change-your-mind-period is up. If anyone reads this - tell me what you think. Reassurance will be most welcome!

Saturday, 2 May 2009

Crafty cuts

Well i have gone into craft over drive recently! My fiancee and I have decided to do a loft conversion in our flat and i am going to decorate. So i have been bidding furiously on eBay trying to snag some bargains, and boy have i found some. 


But whats so crafty about this i hear you ask? 

Well, its what i am going to do with these purchases. Inspired by The Make Lounge, i am going to learn to sew properly and do an upholstery course! And transform the following into fabulous French furnishings.

The first bed you can see is a Vintage French Demi Corbeille upholstered bed. And its gorgeous. I picked it up on eBay for only £175 which i think is a bargain seeing as there are places selling them for close to £2000. Obviously theirs are restored, which is what i am going to do to mine for a fraction of the prices. So how am i going to learn to upholster?

Well a friend of mine told me about this website called Floodlight that searches for courses and learning in your area. Lucky for me i have found what looks like a great course right in my borough, and seeing as i am going to learn how to upholster, i

 thought why not look at another course too 
- and so i have also decided on Interior Design which i think will be really cool and i even get a level 1 qualification afterward. Both courses are available i
n the evenings and only run over approx 10 weeks, so i think it is very do-able. 

Another piece i managed to salvage for only £7 (I was sooooo pleased with this as i had been looking at others that went for £80!) is this lovely old fashioned floor lamp, that i am going to give the Cath Kidston / Laura Ashley treatment and redo in white and some lovely prints on the shade. 
I am also hopping to nab a gorgeous fireplace, but I'm not putting it in here until its definitely mine cause i don't want anyone else nabbing it for themselves!! 

Keep checking in, cause over the next few months I will post pictures showing my progress and the finished products.

p xo


Related Posts Plugin for WordPress, Blogger...